Admins can add new members to your instance by sending invitation emails or by uploading a CSV file to add members in bulk. When inviting members, admins can assign a member type and customize the default email subject and message before sending the invitation. and select team members to notify when an invitation is accepted or remains unaccepted beyond a specified timeframe. Once an invitation is sent, the invited member appears on the Pending tab until they accept the invitation.
To add members:
-
Click the Members icon
 in the top right navigation on the Dashboard.
 -
Click + Add Members from the Members page.

-
From the I would like to add new list, select the member type to assign to the new user(s). For example, Admins, Contributors, Editors, Consumer, and Sources.
-
In the Email addresses field, enter one or more email addresses separated by commas.
-
(Optional) Update the Subject field if you want to change the default invitation email subject.
-
(Optional) Enter a Personal message to replace the default invitation message.
-
(Optional) In the Notify if invitation accepted field, select the team members you want to be notified once the invitation has been accepted.
After selecting team members, the Apply the same recipients from Notify if accepted option appears in the Notify if invitation not accepted field.
Note: Team members receive notification emails only when Email Alerts > System and Users > An invited user joins Kapost setting is enabled. To configure this setting, refer to Systems and Users.
-
(Optional) In the Notify if invitation not accepted field, select the team members you want to be notified if the invitation is not accepted.
Alternately, you can select Apply in the Apply the same recipients from Notify if accepted option to select the same team members selected in the Notify if invitation accepted field.
-
(Optional) In the Notify after field, select a timeframe of 7, 15, or 30 days to receive a notification if the invitation remains unaccepted after the selected period.
Note:
-
Team members receive notification emails only when Email Alerts > System and Users > An invitation is pending setting is enabled. To configure this setting, refer to Systems and Users.
-
Pending invitation notifications are sent at 12:00 AM UTC on the day after the selected notification timeframe expires. The invitation sent date counts as Day 1.
-
If the invitee accepts the invitation within the selected timeframe, they receive no pending invitation notification.
-
Pending invitation notifications are sent only once per invitation if the invitee does not accept it within the selected timeframe.
-
If an invitation is resent before the pending notification timeframe expires, it is treated as a separate invitation. Each applicable invitation can trigger a pending notification, which includes the latest invitation date and the original invitation date. Refer to Pending Tab.
-
If the invitee is suspended or removed before the pending notification is due, no notification is sent.
-
-
Select Send Invitation(s).
Tip: A default email subject and message are provided automatically. You can use the default text or replace it with your own.
Note: If the respective email settings are ON, the sender automatically receives notifications for both accepted invitations and pending invitations, in addition to the members selected in the respective drop-down lists.
Bulk Member Upload
The Bulk Member Upload feature enables you to import your existing members. Your members are automatically added to Kapost and will not receive an emailed invite.
CSV Formatting Requirements
The CSV file you upload should have a header row as the first row followed by one row for each member. The header row should match the following field names:
-
Email: Required. This is what your member will use to login.
-
Password: Optional. If not provided, we'll generate a random password. The member can click on "Forgot Password" in the sign in dialog to generate a new password.
-
Name: Optional. If this is not provided, we'll use the first part of the user's email address.
-
Bio: Optional.
-
Role: Optional. This allows you to specify which role you’d like the uploaded users to have once they're added to Kapost. Learn about the different member roles here.
You can upload members of different roles within the same upload. Specify 'Role' as a separate column at the end of your CSV.
-
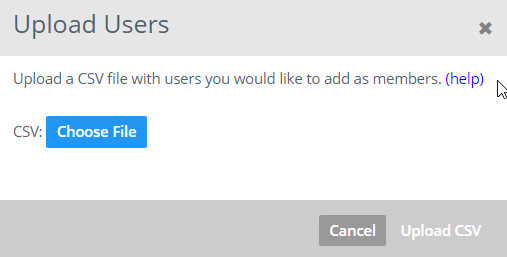
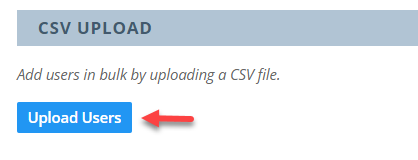
In the Add Members page, scroll down to CSV Upload section and click Upload Users.
-
Click Choose File and select your desired file and click Upload CSV.
.